How To Enable Guest Post On WordPress: Hello, friends welcome back to this awesome blog post where I will tell you or teach you how to enable guest post on wordpress website or in your WordPress blog.
Friends, nowadays it has been important for all bloggers because when you enable guest posting on a website or blog then users and
beginner bloggers take interest to write quality articles to your website because through that they get a good backlink and you get an article for free so you must enable this option to your website.
this is so easy to enable. There are many plugins through which you can accept guest posting easily but I will tell you the most amazing plugin that will help
you to create a beautiful post submission form that will attract many bloggers to write down the article so let’s begin the topic how to enable guest post on wordpress.
Table of Contents
Frontend Post WordPress Plugin – AccessPress Anonymous Post.
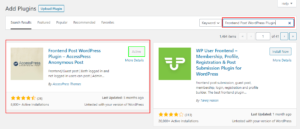
Frontend Post WordPress Plugin: Friends this is the plugin through that you can add a beautiful article submission form to your guest post page this is totally free which you can use and run easily here
you will get many options to make your form attractive so that user may be friendly to write down any blog post you just have to log in to your WordPress site
then go to add new plugin then search for the lagan after that you have to install and active this plugin as you can see in the image upside.
This is a very important plugin for those bloggers that have good domain authority and page authority on their website more than 20 (Domain Authority) so
they must use this plugin and enable guest posting on their site as soon as possible. It will help them to get more free articles.
How To Set-Up This Plugin.
how to enable guest post on WordPress: Friends after installing the plugin and activating the plugin it’s time to set up this plugin properly so that you may generate a good blog submission page here
you will get many options such as general setting form setting captcha setting etc. So let’s begin to set this plugin properly step by step.
1. General Setting
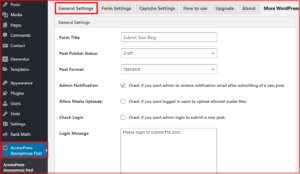
In the general setting, you have to do many things, first of all, you have to set the form title after that post publish status such as draft, pending, private, publish, etc.
It means when any user publish any post so that should be published automatically or should be in the pending that will be published by you after review.
You can give their post-submission message it was whenever and user post any article so he will get a message that thanks you for submitting the post otherwise
if you have generated any page to say thank you so, you can direct at that URL on the redirect URL field learn how to enable guest post on WordPress
2. Form Setting
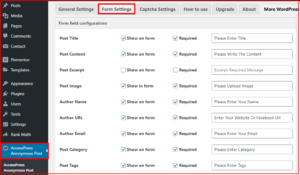
The second option is form setting where you can set up your form style design and require here you can add the options whatever you want to show in the form
you can also add that this field is required or not by checking the box you can also give error message if any field is blank here you are given an option in which
we can select the content editor type such as simple text box, rich text editor, visual editor, HTML editor, I would like to recommend you to choose rich text editor where you get both options text and visual after that you can rename any option as per yours.
3. Captcha Setting
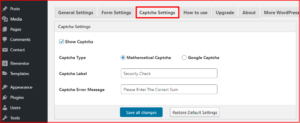
The third option is captcha setting which is the most important for you here you are given two types of captcha first “mathematical captcha” second “Google-captcha” from both
you can select anyone whatever you want to show on the form after that you can set the captcha level name and captcha error message then click on save all changes now you have finally set up your form.
4. How-To Use
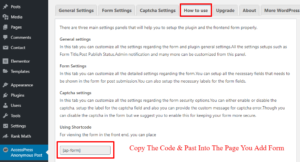
finally, you have set up all settings regarding form now it’s time to publish your form on any page so go to how to use the option where
you will see an option using shortcode there will be a code in two words copy that shortcode and paste in the HTML editor of any page where
you want to show the blog submission form after that click on save changes then go to your website and refresh the page where you have pasted that shortcode you will see a beautiful form has been generated for the users to submit and post.
5. Check Your Guest Post Page
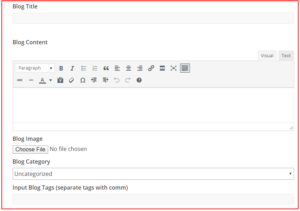
how to enable guest post on wordpress: After setting up to all settings you can go to your guest post page & refresh that after that
you will see that a beautiful and attractive blog submission page to accept quest posts through users or new bloggers.
you can see in the image form is showing which contains all important things to create a quality blog. anyone can write any type of post here.
How To Enable Guest Post On WordPress
Conclusion: we have discussed here how to enable guest post on wordpress site, enable anonymous guest custom post wordpress, wordpress guest post sites,
the best way to add a guest blog post on a wordpress site, how to add guest post option in wordpress I hope you understand the points I shared in details.
Also Read:
- Add A Reading Progress Bar In WordPress
- Custom Font: How to Change Font In WordPress
- High DA PA Do-follow Profile Creation Sites List
- 10 Steps For Best On Page Seo Tutorial
- The Legit WordPress Checklist








thank u so much sir for this helpful information..
thanks for giving your support here.
I will keep writing such posts.